Minecraft is a massively popular game that every person of any age can enjoy. It’s also one of the best games to use for STEM education because it allows players to learn how to build something with their own hands, and then watch it come alive in the game. Today we’re going to show you How to build a water elevator!
Although water is not a source of hydration in Minecraft, it may be utilized as decoration or to interact with other materials. It’s crucial when it comes to creating crop farms that can be fed to livestock, but it’s also critical in cobblestone and obsidian generators.
Water is also useful for transporting mobs and players. You may construct handy water elevators to quickly travel between locations using how it interacts with fall damage and a few select blocks in the game. It’s also how many mob farms operate, transporting mobs from a spawning chamber into the real farm. Here’s how the humble water elevator works, as well as how to build some of the most useful components.
Contents
- 1 Required Items For A Water Elevator In Minecraft
- 2 Build Your Elevator Shaft
- 3 Build An Entrance
- 4 Place Down Water
- 5 Place The Kelp
- 6 Place The Soul Sand
- 7 Make A Way Down
- 8 FAQs
- 8.1 1. What are the different types of elevators in Minecraft?
- 8.2 2. What is the maximum distance the player can travel through an elevator?
- 8.3 3. How do you make a water elevator with magma blocks in Minecraft?
- 8.4 4. How do you make a soul sand water elevator?
- 8.5 5. How do you make a bubble elevator in Minecraft?
- 8.6 6. How do you make a water elevator with soul sand and kelp in Minecraft?
- 8.7 7. What block pushes water up in Minecraft?
- 8.8 8. How do you make a water-breathing potion in Minecraft?
- 8.9 9. How do you breathe underwater in Minecraft without potions?
- 9 Conclusion
Required Items For A Water Elevator In Minecraft
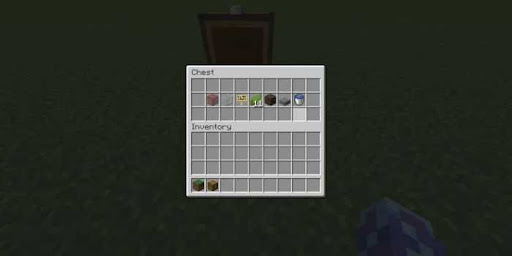
- The water elevator is very low-cost to construct, and all of the necessary materials may be acquired after your first visit to the Nether. This is because Soul Sand is required for the water elevator. You’ll need: 1 block of Soul Sand A lot of kelp A slab of any kind An empty bucket or other vessel Water from a bucket Two signs
- The first thing you need to do is mark the spot where you’ll be placing your water elevator. Dig a hole two blocks deep and one block wide, then place the Soul Sand in the center of it. The Soul Sand will create an invisible block that players and mobs cannot walk or jump onto. Place the Kelp on top of the Soul Sand block. This will be how your water elevator looks when you’re finished!
- Now that the Soul Sand and Kelp are in place, it’s time to put up some signs on either side of the construction site. One sign should read “Up”, while the other one must say “Down”. It doesn’t matter how many blocks apart the signs are from the Soul Sand, but it’s a good idea to keep them as close as possible.
- Finally place your bucket of water next to either sign and you’ll have created a fully functional Minecraft water elevator! This design can be used for elevators between any two points in the world, though they work best underground where mob spawning is not possible. You can also use this concept to create water-based mob farms by placing a sign next to the elevator entrance that says “Down” and another one at the other end of the farm that says “Up”. This will allow you to transport mobs into your farm automatically, making it much easier to collect their drops!
Build Your Elevator Shaft
First, dig the elevator shaft. If you’re digging underground, all you need to do is dig a long single-block tunnel up to the level where you want your elevator to stop. This first shaft will function as an elevator that transports people upwards.
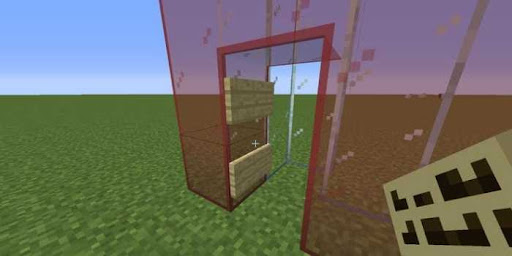
Build An Entrance
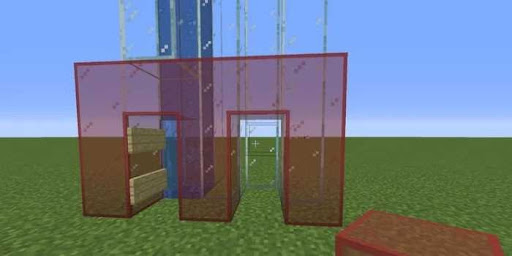
At the base of the elevator, build an entrance that protrudes from the shaft itself. This will be crucial later to keep water out of your base if it flows out of the elevator.

Make sure the shaft is completely finished and that all of the sides are waterproofed. Only water should flow through the center tunnel that leads to the entrance, which should be a two-block tall doorway.
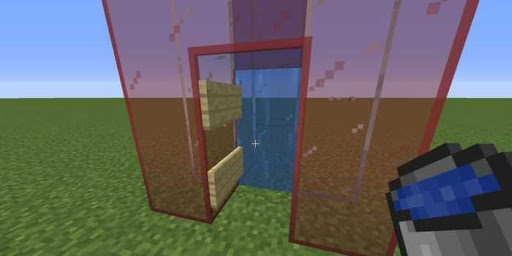
Place Down Water
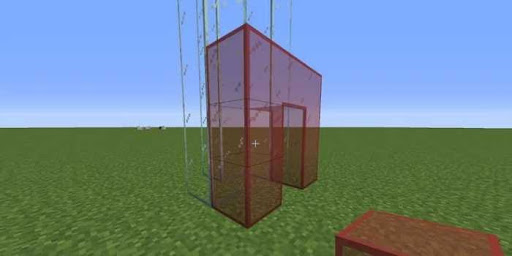
Before you put any water down, it’s time to employ an age-old method. As seen above, lay down two wooden signs on each side of the entrance. Signs are treated as full blocks and keep the water from flowing through the entrance and spreading out.
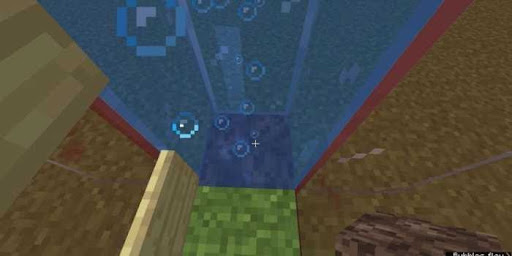
Go to the top of the elevator, where you’ll exit from, and place down your water source at the very top of the shaft, against the last block.
The water will then flow downwards.
Place The Kelp
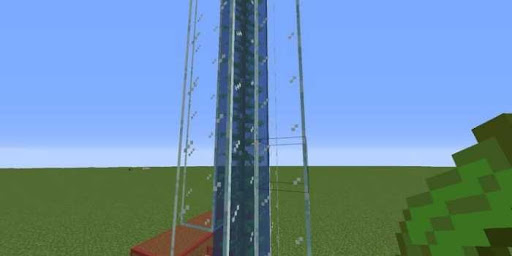
Every single block within the elevator must be a water source block in order for the water elevator to operate. Instead of shuffling through an inventory full of water buckets and dropping them at random, which is time-consuming, you may use kelp. Enter the elevator and lay kelp from bottom to top.
Every kelp placed down will turn each block of water into a source block, and as a result, the elevator will rise. Once this is completed, return to the bottom of the elevator and shatter the bottom kelp since you won’t need it anymore.
Place The Soul Sand
If you placed your kelp properly, the water elevator should now be able to rise upwards. Step inside the elevator and test it out; the bubbles should propel you to the top in a matter of seconds. If you run into difficulties while traveling up, remove the Soul Sand and replace it with more kelp.
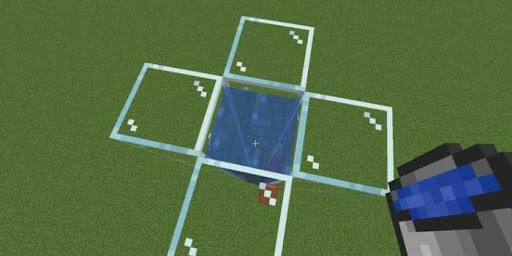
Make A Way Down

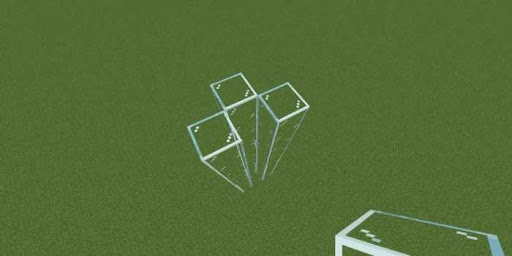
After finishing your upwards elevator, you may want to make a way down. The method for this is much easier, and the design is essentially the same with just a bit of water and wooden signage added. You can simply build a shaft near to or adjacent to your current one as shown above.
Create the exit for the downward elevator next to your upwards-headed one. It can be identical, but you won’t need wooden signs.
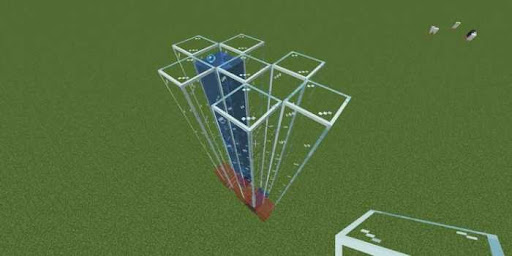
Finish off the shaft all the way to the top. You’ll know it’s correct if the elevators look like two rudimentary flower shapes sharing a petal in the middle.
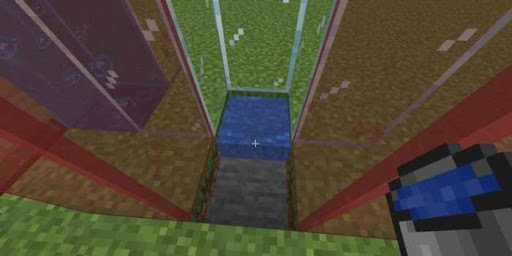
At the bottom of your downward elevator, destroy both the bottom block in the doorway, and the bottom block in the elevator itself. In the doorway, put down a slab of your choice, and in the elevator, place your bucket of water.
Now, if you drop down from the top, you’ll fall into the water block and never take any fall damage. The slab allows you to walk forward without jumping to step out of the elevator easily.
You can also use a Magma block at the bottom and fill the shaft with water as well. The Magma cube works in reverse compared to the Soul Sand. However, this method is slower to complete.
FAQs
1. What are the different types of elevators in Minecraft?
- The two types of elevators are Redstone elevators and water elevators in Minecraft.
2. What is the maximum distance the player can travel through an elevator?
- Your elevator can go as long as you want it to. Due to the soul sand and the magma block being at the bottom, you won’t drown in it. Feel free to make it as tall as you would like.
3. How do you make a water elevator with magma blocks in Minecraft?
After making sure it is enclosed, place some doors to keep the water from flowing out, fill the column up with water, then turn all the flowing water into source blocks, and finally replace the block below your kelp with soul sand to create upward bubbles and a magma block to create downward bubble.
4. How do you make a soul sand water elevator?
Dig the center of your column up to one block down and place the Soul Sand block within. Create a walkway on the Soul Sand and place the two signs. Stand on top of the elevator and place the water on the soul sand. If the water starts moving upwards along with bubbles, you have created the Water Elevator successfully.
5. How do you make a bubble elevator in Minecraft?
Begin making your Bubble elevator by getting the essential objects: two Soul Sand, two Magma Blocks, and at least two Water Buckets. The Soul Sand creates bubbles in your water elevator that make you move up, and the Magma Block creates bubbles in your water elevator that make you go down.
6. How do you make a water elevator with soul sand and kelp in Minecraft?
Then, break the bottom block of the elevator and replace it with a Soul Sand block. If you placed your kelp correctly, your water elevator upwards should be complete and functional now. To test it out, step inside the elevator, and the bubbles should push you quickly all the way to the top.
7. What block pushes water up in Minecraft?
magma block
When a magma block is placed underwater, a whirlpool bubble column is generated. When soul sand is placed under source water blocks, an upward bubble column is generated.
8. How do you make a water-breathing potion in Minecraft?
Add the Nether Wart to the top box of the brewing menu. When the brewing process is complete, your Water Bottle will contain an Awkward Potion. Add a Puffer Fish to the top box of the brewing menu. When the brewing process is complete, the Awkward Potion will be replaced by a Potion of Water Breathing.
9. How do you breathe underwater in Minecraft without potions?
You have to be close to a block where you can dump the water, but if you use a water bucket in the water, it takes the water from around your head and will give you a full breath. You can then dump the water against a block and do it again. You can stay down for a very long time as long as you keep doing this.
Conclusion
Water elevators are great when you need to move upwards and downwards in your base. You can also use them to go down into your mineshaft or to go up to your secret base in the sky. build a water elevator is a great way to travel in your Minecraft world and it doesn’t take as much materials and knowledge as it does to create a Redstone elevator.